
3D view mode
The 3D view mode renders volumes in a in a three-dimensional format. A unique lens lets you penetrate through the volume and see the inside. There are also tools to remove obscuring material from the volume, allowing you to focus clearly on a specific anatomy or pathology.
All of the methods of navigating the data described in General navigation apply in 3D view mode.
Changing the image orientation
Orientation information is always visible to clearly indicate how a patient is oriented (posterior, anterior, superior, inferior, right lateral or left lateral).
There are various methods for changing this image orientation, described below.
Keyboard shortcuts
You can use preset hotkeys (keyboard shortcuts) to orient the volume of the image to different positions, or to return it to a known position.
The preset hotkeys for patient orientation in 3D mode are based on the position of the keys on an English US keyboard. The hotkey letters never change, regardless of the user's language or keyboard.
| Orientation | Keyboard Shortcut |
|---|---|
| Left Lateral | L |
| Right Lateral | R |
| Posterior | P |
| Anterior | A |
| Superior | S |
| Inferior | I |
Interactive orientation widget
In 3D view mode, patient orientation is indicated using an interactive orientation widget in the bottom right of the image. You can snap the volume to any of the six standard orientations by clicking the spheres on the orientation axis.

Rotate feature
The Rotate feature lets you quickly rotate a volume in any direction.
To use the Rotate tool
- Click the Rotate tool
 .
. - Click the image, then drag in any direction.
To rotate by using touch gestures
- Drag the image with your fingers
Magnifying part of a volume
On desktop browsers, you can use the lens tool to magnify a selected portion of the volume in the 3D view mode while keeping the entire volume in the main view. A magnified view is displayed in the upper-right corner.
The lens tool is made up of a lens and a magnified view. The magnified view shows a close-up of the area covered by the lens.
To enable the lens tool
- Press the O key.
To move the lens over the volume
- Position the pointer over the lens to select the lens.
- Click and drag to reposition the lens.
To move the lens through the volume
- Position the pointer over the lens.
- Scroll the mouse wheel up to push the lens deeper into the volume or down to move the lens in the opposite direction.
To adjust the magnification of the lens view
- Position the mouse pointer over the magnified view. This selects the magnified view.
- Do one of the following:
- Scroll the mouse wheel up to increase magnification.
- Scroll the mouse wheel down to decrease magnification.
Removing obscuring anatomy
You can use either the clipping planes tool or the scalpel tool to remove obscuring material from a 3D volume. The scalpel tool is only available on desktop devices.
Using clipping planes
You can slide clipping planes into the volume to cut away obscuring features. Clipping planes appear as a box drawn around the outside of the volume with spherical “handles” located on the corners and sides.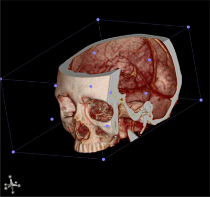
To toggle the clipping planes
Do one of the following:
- Select Clipping Planes
 from the view menu.
 - Press the C key.
To rotate the clipping planes
Do one of the following:
- Click on an edge of the clipping planes and drag.
- Click on a corner of the clipping planes and drag.
To resize the clipping box
- Click a “handle” located in the side of the clipping planes and drag.
To rotate the volume when clipping planes are enabled
- Click outside the clipping planes and drag.
To reset the volume’s clipping planes and orientation
Do one of the following:
- Click the Reset
 tool.
tool. - Press the HOME key.
To reset the volume’s clipping planes (desktop only)
- Press the G key.
Using the scalpel tool
You can use the scalpel tool to cut away obscuring anatomy with a much greater degree of precision than using clipping planes.
To toggle the scalpel tool
- Press the X key.
To cut away obscuring features
- Left-click and drag the scalpel around the region of interest to create an outline.
- When satisfied with the shape of the outline, release the mouse button. Position the mouse cursor over the region you wish to highlight and remove.

- Press Delete to remove the region.

To undo cuts made with the scalpel tool
- While the scalpel tool is enabled, press Z.