
2D view mode
The 2D view mode displays data in a two-dimensional format. It is the default view mode, and is always available, regardless of the type of image loaded into the viewer.
In this view mode, you can view slices as they were originally acquired, flip/rotate, magnify, and scroll images, as well as play series as a continuous "cine" reel, and view multiples images simultaneously for comparison purposes.
All of the methods of navigating the data described in General navigation apply in 2D view mode.
By default, the application will automatically load images in the optimal layout based on the device screen size, modality, and number of series in the study. See Intelligent layouts.
Server administrators can disable intelligent layouts. In this case, all images would load in the last selected layout (or to 1x1 layout if the last image was viewed in 3D or MIP/MPR view mode).
You can change layout at any time by selecting from the following options (some layouts may not be available, depending on screen size and device orientation):
|
|
1x1 Single Layout |
|
|
1x2 Side-by-side Layout |
|
|
2x1 Top-Bottom Layout |
|
|
2x2 Grid Layout |
If you are viewing multiple images simultaneously, each layout pane will have its own view menu, allowing you to interact with each image independently of each other. The active pane will have a border around it for easy identification.
To quickly toggle between a 2D layout and a 1x1 single layout
- Double-click the 2D layout pane you wish to see in 1x1 single layout. Double-click the view again to toggle back to the previous 2D layout.
To display selected images in 2D layouts
Do one of the following:
- Drag the desired series from the worklist into each of the panes in the layout. (Desktop only)
- Double-click the desired series.
- Tap the desired series in the worklist and tap the pane you wish to view the image in. (Touchscreen only)
Linked Scrolling
When scrolling is linked, images in different views that share a common frame of reference will scroll together.
To link scrolling
- Click the Link Scrolling tool
 .
.
To manually link scrolling by slice
Sometimes the data set does not contain slice position information and you must manually align the views visually by scrolling to the desired parts of the anatomy before linking the views.
- Scroll each of the views to the respectively desired slices.
- Click the Link Scrolling by Slice Number tool
 .
.
Changing the image orientation
Orientation information is always visible to clearly indicate how a patient is oriented (posterior, anterior, superior, inferior, right lateral or left lateral).
In 2D view mode, patient orientation is indicated using letters at the edge of the image (top, bottom, left, and right).
The letters displayed as orientation labels at the edge of the image come from the DICOM source data, and could vary depending on the data set (if the data was generated in a different language, for example).
You can quickly change the patient orientation to view the image from different angles by using the mirror and rotate tools.
|
|
Mirror Vertical |
|
|
Mirror Horizontal |
|
|
Rotate clockwise |
|
|
Rotate counter-clockwise |
Scrolling through images
You can scroll using either the Scroll tool or, when a tool other than Scroll is selected, you can scroll using mouse and keyboard or touch gestures.
To scroll using the Scroll tool
- Click the Scroll (
 ) tool.
 - Click the main view, then drag up or down.
To scroll using mouse and keyboard
Do one of the following:
- Scroll up and down with the mouse wheel.
- Press the Right arrow key to advance to the next slice and press the Left arrow key to go back to the previous slice.
To scroll using touch gestures
- Drag up/down.
Alternately, to scroll through single images:
- Tap near the top or bottom of the view
To scroll through images using the image slider bar
- Click the slider and drag left or right.
You can also “jump” to an image by clicking directly on the image slider bar.
If the series contains GSPS/CSPS objects, the image slider bar will display vertical ticks indicating the location of the images that contain these objects. You can use these ticks to jump to the images.
You can also scroll through only the images containing GSPS/CSPS objects by using the next and previous buttons to the right of the bar.

Using cine
Cine mode automatically scrolls through images at the current window/level and zoom settings. Motion studies, such as cardiac ultrasound or X-ray angiography, will automatically open in cine mode at the frame rate specified in the DICOM header.
Viewer interactions such as pan, zoom, window/level etc. are disabled while cine mode is activated.
To activate cine mode
- Select Cine
 from the view menu. The image slider bar will fill with color indicating data buffering progress.
To start scrolling
- Click the Play button
 . (You may start scrolling even while the data set is being buffered.)
To stop scrolling
- Click the Pause button
 .
.
To adjust maximum framerate
- Click the fps button and adjust the slider to the desired framerate.
To reverse scrolling direction
- Click the fps button and click to fill the Playback Reversed check box.
To deactivate cine mode
- Click the X button.
Viewing the content of the DICOM header
Some elements of the DICOM header appear as an overlay over the DICOM images. The level of metadata shown in this overlay is configurable (see Configuring the level of metadata). In 2D view mode, you can also view the entire content of the DICOM header; this feature displays the full metadata in a table format in a separate window.
To display the content of the DICOM image header:
- Select DICOM Header
 from the view menu.
Magnifying part of an image
On desktop browsers, you can magnify a region of an image with the 2D Lens tool.
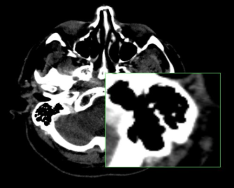
To toggle the 2D Lens tool
- Select Lens
 from the view menu.
 - Press the O key.
To move the lens over the image
- Click on the magnified region and drag to reposition the magnifying glass.